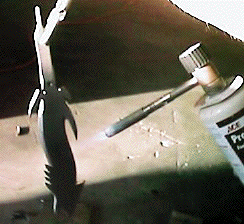
(The Hammer)
The official Transmission of the Klingon Imperial Weapons Guild.
9902.15____________________________________________Vol.3/No.2
Greetings !
I welcome all of you who appreciate the seductive curves and radiant warmth of steel fashioned into the perfect Klingon blade - the betleH vaQqu' !! Whether you are fortunate enough to create your own custom weapons, aspire to learn the art or just want to associate with blade-smiths, *The Guild* is here to serve you and the Empire.
K'Daq son of Toragh
![]()
The recent growth of the Guild has brought with it a certain number of good points and bad points. I am proud of the way in which the membership worked together to *iron* out the bad points. In doing this you have allowed the membership to start taking part in more Guild discussions. Knowledge is being shared on a daily basis and its great ! It is particularly satisfying for me to see groups discussing topics on their own and as a result, they are creating strong friendships based on common interests. I couldn't have asked for a better result from the formation of this group. I commend you all.
Keep your forge hot !
K'Daq
![]()
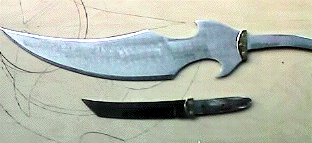
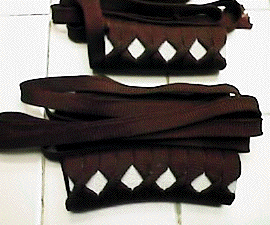
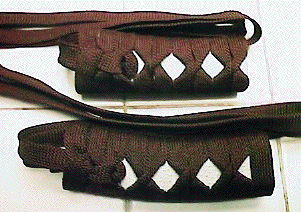
Sheath Construction for the DS9 Daqtagh
There are a variety of ways to construct sheaths for knives and a variety of this particular knife among warriors of the Empire. In this article I am going to concentrate on one type of knife and one technique.
In this technique you basically *sandwich* your blade between several layers of leather that are held together with stitching and glue and then decorated with hand worked sterling silver hardware.
I will be using the standard Daqtagh sheath seen in *The Art of Star Trek*, but it will have modifications to it. I firmly believe in letting your individual creativity dictate how you procede on your works of art. If you are to *infuse* part of your spirit into your creations then you should try to avoid the *cookie cutter* look as often as possible.
The Basic Sheath Design
So.....although this sheath will maintain the design of the Imperial Sheath, it will be made of totally different materials in order to reflect my *personality*.
In this type of sheath you first need to draw up *templates* from which to cut your leather. You need to leave about 1/2 inch of room for stitching and the thickness of the blade in the *pouch* that you will be sewing. So I usually take the knife pattern itself and merely outline it 1/2 inch outside the lines.
The Daqtagh poses some unique problems though. It has an expanded point and moveable guard blades, so you need to *factor* those into the design.
Netark has seen one of the functional sheaths and he observed that the side portions are not sewn together so that the wider tip can slide out easily....rather than making a uniform *fat* sheath, this gives the sheath a more pleasing appearance. There is also an *option* in which you can sheath the weapon with the guard blades open or closed. I believe that this is to take into the consideration that the warrior might be carrying the blade in *readiness* or in the company of friends. It would be appropriate to have the secondary blades open and ready for use if you were in a dangerous atmosphere and it would be appropriate for you to close the guards as an indication of your peaceful intent if you were among allies.
This is my interpretation and I think it follows the code of honor of the warrior. Although it is very impressive to see a warrior *snap* open the guard blades, the split second required to undertake that operation might mean the difference between life and death in battle.
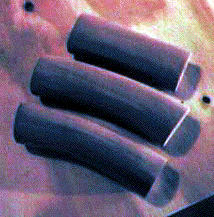
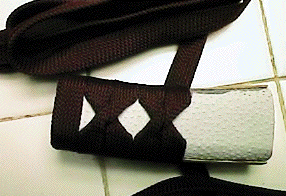
So these first pics are of the templates and the leather used for the interior.
Initial Pattern Outlines for top and bottom halves of interior sheath wall. Note the expanded outline of the bottom layer. I thought this would allow the weapon to slide into the sheath easier without hanging up on the warrior's uniform. However, this idea would change after the *pouch* was initially sewn together.
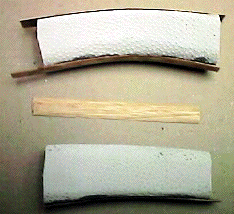
This shows the pattern for the *liner*. This layer creates a *pocket* by separating the halves and allows for protection of the stiching from the steel blade and it makes the formation of the pouch much easier. The thickness of this liner layer is based on how thick your blade material is.
This shows the liner and the bottom layer *rough cut*. You onlu have to make the interior cuts on the liner with care. It is difficult to position several layers of leather especially when one is as thin as this layer will be. I make it oversized and then trim all the layers to my final shape after the glue has set up.
This last pic shows the relationship of the blade to the liner and the bottom half of the sheath.
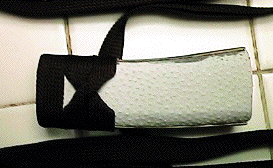
I always position the leather layers together with adhesive in the initial assembly. This allows me to seal the edges, and to stabilize the entire construction prior to punching the holes for the stitching.
The first area where I *depart* from the standard Imperial Sheath is here. I use Elephant hide as the exterior of the sheath. It is very durable, and has an interesting surface. My sash is made of Elephant hide as well, so this ties together the overall *look* of my uniform. Since I am an ancient Klingon and live an isolated life, my accouterments should reflect an almost *foreign* look to those of the main line Imperial warrior. Take this into consideration when you create your *accessories* as well.
Of course many of you dress in *standard issue* and it would be inappropriate for you to go too far out of line.

This shows the same patterns laid out on the Elephant hide. They are the outisde of the *sandwich* and should have the same outline.
This shows the Elephant glued down to the leather prior to assembly. The smooth side of the leather is facing to the inside so as not to mar the blade.
This shows the first stages of the assembly. The layers have been glued together and holes have been punched.
There are numerous methods used to punch holes for stitching. I use my drill press. This might seem like *overkill* but my hands are extremely arthritic and *uncooperative* so the *press* makes it an easy (and boring) task. Also, my knives tend to be large and using a drill allows me to pierce the thicker sheath assemblies. You can also use an awl. If you use an awl, make sure it is a true cone and not one with a cutting edge. The cutting edge will create a possible *split* when the stitch is drawn tight. There are also tools for punching uniformly spaced holes, but my sheathes are usually to thick for these to work well. I am using a *cross-stitch*. This *rolls* all the layers in toward the center and protects them from tearing with use. I would usually have died the interior black at this point but I left it *raw* to provide contrast so you could see the stitch. It is basically like lacing a shoe and I arrange the direction of the lacing so I can hide the knot under hardware or in a less visible location on the sheath (usually the tip).
Ths shows the forward *triangle* section that holds the blade sewn together and the cross-stitched layers that surround the guard blades sewn down.
You can see the *tail* of the stitching hanging loose by the guard section. This will be trimmed and hidden whe this section is closed up in the next installment of this article. You can also see that I have removed the extra material from the base of the sheath. In stead of producing a smoother function, it actually made it harder to get the blade into the sheath due to the thick handle of the Daqtagh.
At this atge I will *loosen* the leather up to finish forming the pocket, I'll dye and seal the interior leather and finish sewing the layers together.
**Next month:
We'll add the *hangers* that suspend the sheath from its chain and we'll create custom sterling hardware for the sheath itself.
Silver smithing is not all that differnt from steel smithing. You just use smaller hammers and less heat. I think you'll find it interesting.
Japanese/Klingon tajtIq and tanto: A Handle project
Last month we discussed a number of handle techniques and how to incorporate them into your projects. I have been working on a project for a good friend of mine for several years now and I have been *laboring* over how to make it special for the warrior in question. She has a Japanese father and a Klingon mother. The history of her house ties together the importance of honor to the Japanese samurai warrior and the importance of honor to the Klingon. The end result is a warrior with intense pride in her heritage and an unfailing loyalty to friends and family.
I finally settled on making a Klingon blade and placing a traditional Japanese *Tsukamaki* or wrapped hilt.
The knife pair that will receive the wrapped handle.
As you can see, they both have modified oriental tangs to allow for easy removal of the handle. Well made Japanese weapons could be held together by one or two strategically placed pins. This is a level of craftsmanship we can all aspire to. We'll see if I can get there with this pair.
The classic Japanese sword has a handle that curves *up* while the tajtIq curves *down*. It was important to keep the Klingon design in the blade so this curve was maintained prior to wrapping.
**The instructions for wrapping and knotting a Japanese handle are from an article by Bill Shappard: http://www.stud.uni-hannover.de/~herden/ken/tsuka/tsuka.htm .
All credit for the proper manipulation of the materials should go to him and his well laid out article. You should refer to this article if you attempt to duplicate this project.
As you saw in last month's issue we started with a wooden *core*. In this case I used african mahogany.
The wooden core of the wrapped handle.
These are made by outlining the handle on your target block of wood. After cutting the shape out, but prior to shaping the handle you carefully section the wood in half. The outline of the tang is transferred to the halves and this is carefully chiseled out. This is an important step. The more care you use here the better the fit of handle to tang. The halves are then carefully glued together and shaped smooth with a thin oval cross-section.
The wooden cores wrapped in shark skin.
Traditional Japanese handles are wrapped in *Ray* skin. According to Mr. Shappard's article the word *Ray* is a loose translation and can mean shark as well. They are both in the same family and their skin is quite similar. At any rate.....use what you can find.
The skin is glued to the wooden core in either one piece or in two *slabs* that cover the lateral walls of the handle. The reason you can use two halves is that you also apply a thin wooden strip to the upper and lower center of the handle in order to provide a more uniform shape to the wrap. This strip will cover any joints left by using two pieces of skin and thus reinforce the overall handle.
In this picture you can see the skin applied to both cores and the wooden strips applied to one handle. The last strip is laid out for you to get an idea of it's dimensions.
Starting the wrap.
According to Mr. Shappard, there are over 100 methods with which to wrap a Japanese handle, so if this doesn't follow your handle at home - just *keep your shirt on* <G>. The idea is to be creative and carry on a traditonal art form. The end results are what are important.
Before you start the warp you need to estimate how much material you'll need to finish the project. Most methods of estimating are based on the traditional size and shape of Japanese weapons. Klingon weapons will be different and the tanto has a short handle on top of everyting else.One rule of thumb is to wrap the material around the handle ( butting each turn against the next )thirteen times. This will be a close approximation of the needed length.
For the tajtIq this came to almost 12 feet and for the tanto it came to 10 feet. In other reading I saw estimates in which they reduced the number of wraps according to the size of the weapon and in those the tanto was wrapped only 7 to 9 times.
Since I was using a synthetic blend material and cost wasn't too prohibitive, I just did the 13 wraps to be safe. It turned out to be REALLY safe. <G>
What you are looking at in this picture is the first wrap. The material is held on the opposite side of the handle from this picture at its mid point. The two ends are wrapped in opposite directions so that they surround the handle core. After this the top strand is bent at a 90 degreee angle to the wrapping path and then twisted another 90 degrees so that it again follows the path only now it is one width further along the handle then it originally was.
It is in this *gap* that the other side is wrapped. It too is bent at a 90 degree angle and then twisted 90 degrees again and the end result is that you have the handle covered by continuous wraps and there is now a diamond opening between the wraps. So basically the strips meet at the middle, twist, cross and continue.
After this stage you must hold this intitial twist steady with either a padded clamp or an icepick. If you don't it will unravel. You also insert a paper triangle within each twist in order to fill out the wrappings and create a more uniform shape to the handle.
This shows the second group of twists.
You can see in this picture how the wooden strips support the wraps and also how it is critical that you make your twists at the same position so as to create a uniform diamond pattern along the handle.
The wrapping is finished, but not knotted off yet.
Both handles are now completely wrapped. Notice how the diamonds all line up and have the same size and shape. The next stage is to actually tie off the wrapping.
Tying off the wraps.
When the wraps are complete the material is tied off in an intricate knot that passes through the pommel. You start by making a knot on one side of the handle which can be seen in this picture and then the material is passed through a slot in the pommel and knotted off on the opposite side.
This is where we stop for this month. The guards and pommels on these knives will be custom cast brass and they will be the subject of next month's *Workbench*.
**Next Month:
Casting brass hardware using the *lost wax* and *centrifugal* casting technique.
![]()
******
The following article has several excelent pictures that go with it, but I have been unable to get out of the house to scan them to disc. As soon as I am able, I will repost this page with them on it.
Making the tajtiq the Hard Way
by toQDuj
Some of you might think that without a couple of *thousands* spent on tools, you won't get far, and therefore you might say that's a valid *excuse* for not making knives, swords or axes. You don't need a lot of time without them to make something. I'm a student, so that gives me a little more time than some of you, but it isn't crucial. Will - power is. Like many of those American commercials " 5 minutes a day behind this *oh so good machine* and you'll have more pain in the ass than anybody else in a matter of weeks", this is also a diet. But apart from giving you great chunks of meat around your arms, it also gives you willpower to get it finished, and a lot less fat (if you have any. If not, consider eating before you work on them knives). Anyway, my tajtiq came out of a little bit of time a day, or a week. No matter how many times I had "something else to do", it got finished. And here is how.
"... this revolutionary new car polish only $99,99 ...."
On an evening, while watching another boring show on tv, I thought, hey, let's start on a weapon instead of this weekly boring show. So I walked up, and there it was, a chunk of metal discarded by me, after using it for my d'k tagh. I grabbed the scratched calculator, a bag of nuts, a can of Coca Cola, a marker, a ruler, and a little pic of a tajtiq. don't fuss about curves, just draw 'em loose handed. they'll never get cut well any- way.
The next day, a saturday, when I found myself lying bored before the tv again, I got the sheet of metal, my hacksaw, a new blade, and just started. The little points are the worst. I couldn't get the base of them right, and they still look not quite right. I cut the weapon twice, one time a rough cut, the handle greatly oversized, and angles everywhere at curves. the second time isn't really a second time, but comes when you start perfecting it. I then cut little corners of where I please. I also got the idea of the holes in the blade. They're pretty useless, but I wanted something in the middle of the blade, so I came up with that.
After that day, I had the blade in my room, and a file next to it, and sometimes, after a tiring day full of boring teachers, I'd grab my file and started removing all those little saw-marks off the edges. so came the day I filed the entire lead edge sharp, which is of course still a bit wobbly if you run your finger along it, and after that I came with the idea of making two guard-plates, to making it a little 3-d. Then I made an error of judgement in time. I thought I'd have those on the blade in a matter of hours, but those were first rough cut, then fine cut, but still way too large. I started filing, and came luckily to the idea of riveting it on before the filing was done. The holes were drilled quite quickly, a little bit too large, and I let the to-be-rivets extend a little more than 5mm on each side. I spent at least an hour sledging them into place. I found out that during riveting, the side-plates became offset. There's nothing to be done about that, so after that I started with my hacksaw for the third time, to make em fit.
Today (monday the 18th of January), I found myself, after school, a little time and found a hand-held powered sander in the garage. I tried a 100 grit, and the grit just flew off. along with a good bit of the oxidation too. The tool is great for rough sanding and polishing it with copper polish, but for the fine sanding I still used a sanding block. I made two pics, and then varnished it. I hate that. It seems to take the hard work for the shine out of it. I had to do it cuz the metal I use dulls when not polished within two days. So when I'm making my display cupboard,I'll have to fiddle around with the lighting to retreive that. Anyway, I'm extremely proud of my work, shining in the sun, and I can't wait to get hold of some metal for my third knife. I actually like non-powered tools, I get the sensation that all my effort (and I need a lot for me to get the feeling that I actually did something) is put into that one piece of metal. And, since I'm a student, I don't have money to buy machines. I think I can produce 4 weapons a year. One each season. I think I will, for the rest of my life.
"... You can even excersise while watching (our commercial on) tv (GET MORE CREATIVITY NOT WATCHING TV!!). And with only five minutes of work a week, you can get splendid results... "At first I wouldn't believe it, but it really works!", "this was I before, and now I found a new meaning of life!". Get thigh master's eb-flex now, and have this <fancy sound> as a bonus, bla bla. no cure? send it back (in 30 days) for a full money refund. (this device is brought to you in 30 days (what a coincidence!))"
Geez, if K'Daq rambles, what's this supposed to be!
*****
HAHAHAHAHAHA. toQDuj, if you keep making knives like these, you can ramble on all you like. Anyway......I think rambling is a sign of creative *genius* <GGGG>.
quv'etlh
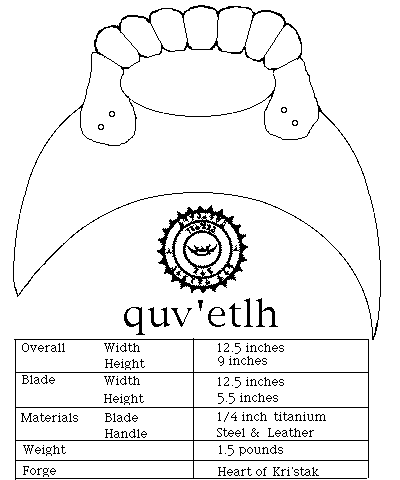
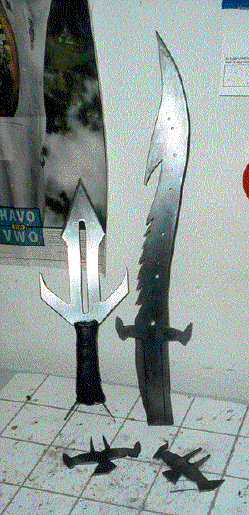
The *Klingon CD ROM* describes the quv'etlh as a weapon used with a small shield and is a standard member of the traditional Klingon nuH bey' or Weapons Display. Since it is considered a standard unit of this most traditional symbol in the Klingon warrior's home we must assume it has ancient origins.
I wanted to approach this project as if I was making a weapon during the *heroic* times on Qo'noS. Quality metal would be difficult to produce and therefore very valuable. You wouldn't waste your fine steel or exotic metals on a handle. For that reason I elected to make the blade as one unit and the handle as a separate piece that attached to the blade with rivets. It gives the overall weapon a much more authentic look and feel and it does *carry* an ancient *air*.
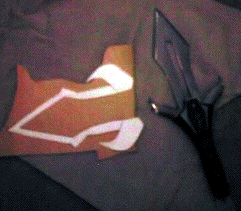
The blades laid out on quarter inch titanium
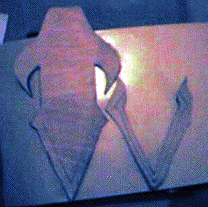
The handle pieces laid out on quarter inch 310 stainless and quarter inch titanium.
I decided to add a little to the standard design by incorporating a center piece to the handle that supported a *talon* on both sides of the handle. This section would be made of titanium. The handle would eventually be finished with a full tang slab of mahogany (I think <G>).
The *Heir* to the Forge at Kri'stak chisels out the patterns.
Many of you have expressed concern about the future of the Heart of Kri'stak. This is my young son T'Daq. He has worked on many of the projects on these pages. He likes a 2 pound hammer when he's *pounding*.
The blade of number one quv'etlh chiseled out.
Using K'Beck's method of outlining the pattern with drilled holes and then *connecting the dots* with a chisel, we patiently cut all the parts out.
Some of the handle parts after chiseling.
The blade after it has been *cleaned up* to the pattern lines with the belt sander.
I take the metal after it has been *roughed* out with the chisel and bring it close to the pattern lines with a stone on the bench grinder. Then this is taken to the table mounted belt sander which cleans the lines right to the pattern.
Both blades finished and ready to be heat treated
Using the belt sander and a series of standard belts - 80, 120, 220, 320, 400 grits. The blades are first smoothed and then the bevel is placed on each. I chose to bevel the entire leading edge of the crescent and most of the outer edges. I left only a few inches of rounded metal near the handle for a possible hand rest area.
Next month:
The Handles and assembly of the weapon.
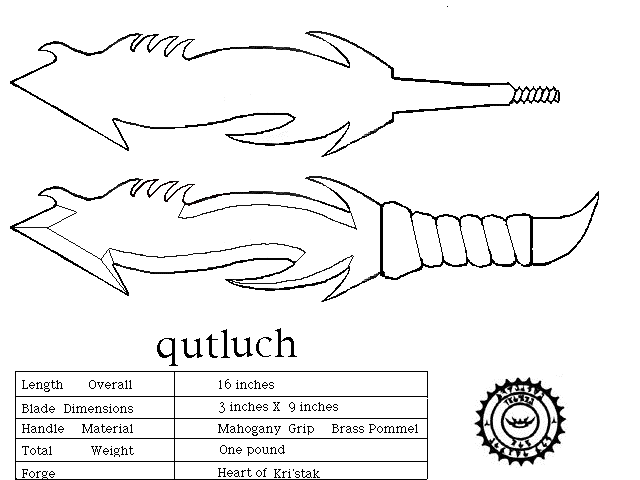
qutluch *revisited*
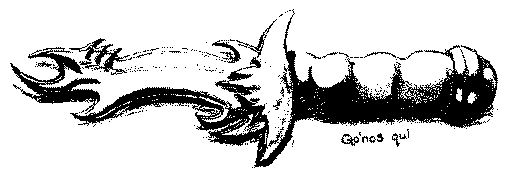
I have always liked the qutluch. It is a weapon that can pack so much design into one small package.
In the original qutluch there were areas that I felt could be improved. Its really easy to disagree with Paramount when they *jerk us all around * so much <G>.
Anyway, I made some slight changes to the original design and chose to use my last piece of titanium in order to see this knife become reality.

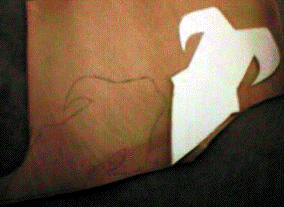
The pattern laid out on the quarter inch titanium
As you can see I altered the pattern after I traced it to the metal. Designing for me is a constant process. I might draw one shape and find that it *looks* better with certain changes once it is placed on the metal. After the piece is cut out I might find that certain areas *feel* better when they're changed......so the pattern gets altered again. Don't feel like you have to stick with the original design. You're the artist......go with what feels good to you.
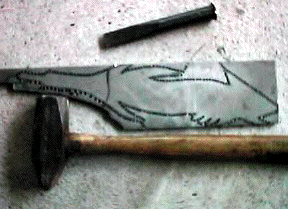
The pattern is outlined with 1/8th inch holes
I used a 1/8 th inch drill on this one since there were so many small details. It got me closer into the pattern and cut down on my *clean-up*.

The pattern all chiseled out
Using a 3 pound sledge and a 1/2 inch chisel the *dots* are connected and the pattern is roughed out.
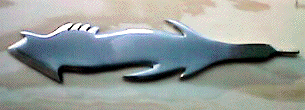
The blade after it is cleaned up and polished
I know this pic skips a lot of steps, but if you've seen a guy use a stone once you seen it all. I didn't want you to get too bored. <G> You should note that I haven't made the *shoulder* cut for the guard and handle. At this point I was not sure how I was going to procede. I was *leaning* toward a solid carved wooden handle due to my failing strength, but I later decided that the knife deserved a good handle with more class than the Paramount *cop-out*.
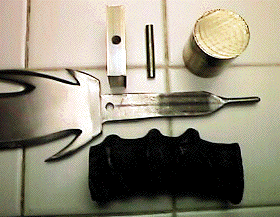
The *Rest of the Pieces*
I am getting a little ahead of myself, but I wanted you to see the horn handle and the brass that would be going into the guard and pommel. Its all very *massive* but the light weight of the titanium goes well with the heavy brass. You can see the final shoulder prepared now and the threaded tang. The hole in the tang will be for the rivet that holds the guard. You can see the pin in the upper picture.
This is to show you a rough idea of how the pieces go together in a horn handled knife.
You have the guard fitted to the blade, the horn sliding over the tang and filled with a support material (epoxy etc) and the heavy pommel capping the whole thing off by screwing to the threaded tang. Obviously there is a lot of shaping to be done to both the guard and pommel. If you check the plans you'll see that I wll be fashioning a talon from the pommel brass. The guard will be more of a smooth continuation of the horn lines.
Heat Treating the Blade
OK back to the blade steps. The titanium is now heated to bring out the colors of the material. One major goal of this project was to produce a blade with many contrasts - the rainbow colors of the titanium. next to the high gloss brass, next to the ebony polish of the Bresbok horn.
The treated blade being quenched in Lusor
The deep blues and purples really came out on this piece. You can see the two holes that will hold the brass foreguard.
Another view after quenching
This view allows some of the rainbow coloration to show through and it gives my pet Targh *Valeria* a chance to finally get in a picture. Although from this angle she looks more like a really big tribble.
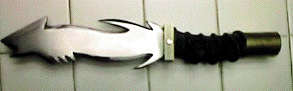
Foreguard placed and polished
Trying to get one of those *sunshine shots* like toQDuj........oh well. Maybe next time.
Close up of final blade ready for handle work.
Next month:
Assembly of the handle. We'll fit and shape the guard and pommel. Those will be polished and set in place and then the final polishing of the horn itself to bring out the deep coloration in the Bresbok.
Plan of the Month:
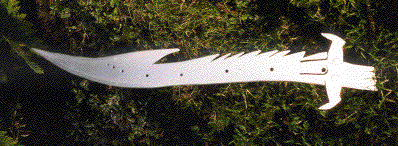
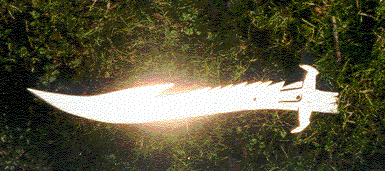
The Sword of Kahless
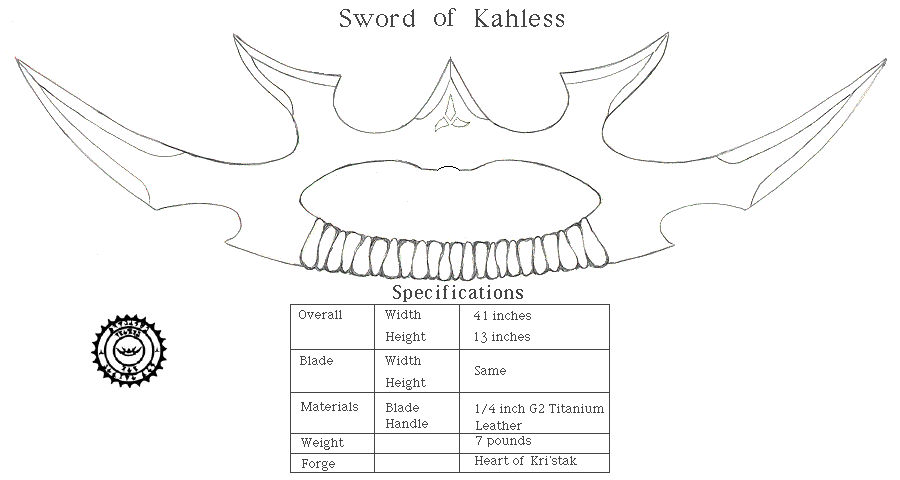
Refer to the Titanium Sword of Kahless posted in the *Kri'stak Collection*. This image can be printed and enlarged to 41 inches across with a blueprint machine to produce a working plan. The statistics listed above also refer to the Sword of Kahless in the *Collection*.
![]()
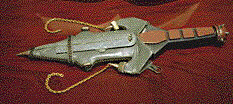
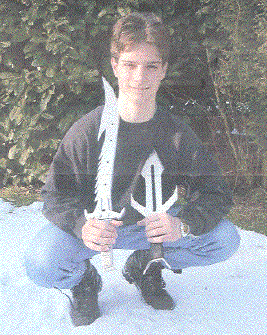
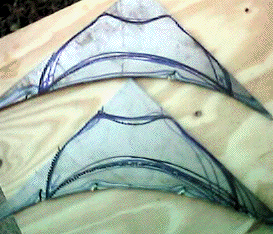
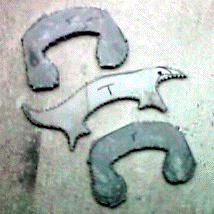
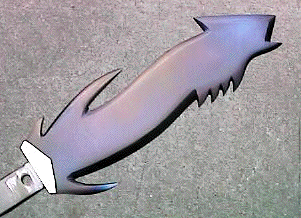
B'Tana has created a very graceful but deadly weapon. The accompanying text didn't scan well so I will *pass on to you* that this weapon is 16 3/8 th inch in overall length and has a blade length of 9 1/4 inches. The pommel and guard work are excellent - I love anything that looks like a talon <G>. With the heavy blade, these will create a nice overall balance to the weapon. Well done!
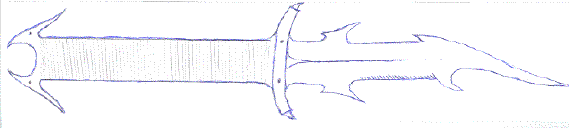
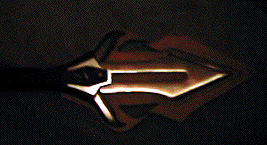
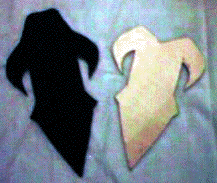
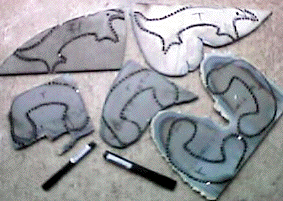
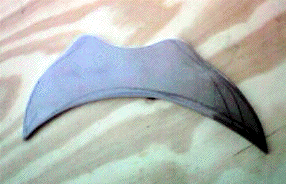
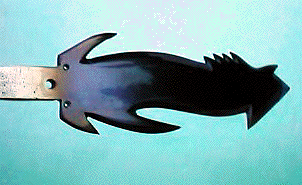
toQDuj's *qutluch*entry. This picture and the ones that follow from K'toQ show a developing *style*. I think when he named himself *toQDuj* it was obvious that his love for Birds of Prey would be reflected in his work. I have the same love. I really like seeing talons and *tearing beaks*. These are shapes that are integral to the Klingon artist.
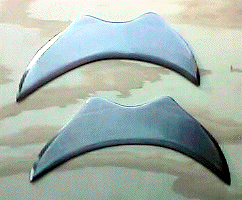
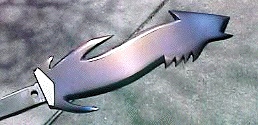
K'toQ continues to send his designs in. My feelling is that we either need to get this warrior out fitted with some tools or he needs to develope a partnership with a working craftsman. These designs are excellent.
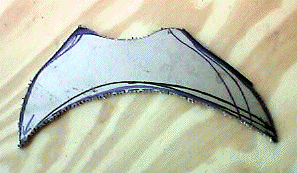
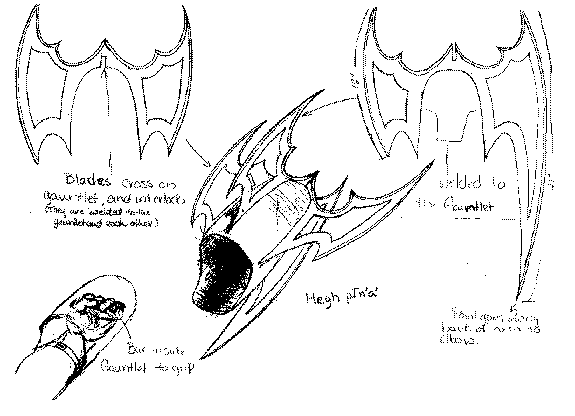
As you look at the design above, I know what you're thinking........so did K'toQ.......it does look like something Batman would carry around.
I've had a similar problem with some of the axe designs. It was hard to avoid the *bat-er-rang* syndrome <G>.
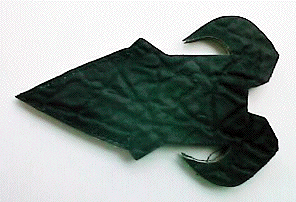
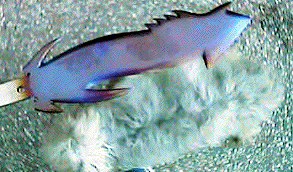
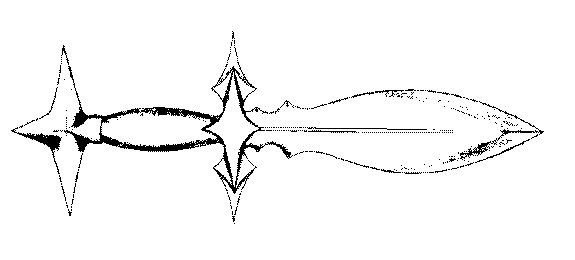
This is K'toQ's entry in the qutluch contest. I really like the looks of this - there is a grace to the weapon. I can see a *screaming eagle* in the tip. <G>As always, I like to see what comes from the mind of K'toQ.
For that matter, I like to see what comes form the mind of all of you. If you have even the smallest *inkling* of an idea.......send it in. The Gallery is a place to share your ideas and dreams and to learn from those of others.
Next month:
1.*Smithing* Sterling silver hardware on the Daqtagh sheath
2. Creating patterns and *casting* custom brass hardware for the Japanese/Klingon projects
3. Completion of the quv'etlh
4. Completion of the new qutluch
5. Winners of the qutluch contest announced
6. Plans for the ma'veq
7. Member's Gallery
8. New contest announcement ?
Questions?
K'Daq <kdaq@kingwoodcable.com>
K'Beck <K-beck.tai.DevnoH@usa.net>
