(The Hammer)
The official Transmission of the Klingon Imperial Weapons Guild.
9811.15____________________________________________Vol.2/No.6
Greetings !
I welcome all of you who appreciate the seductive curves and radiant warmth of steel fashioned into the perfect Klingon blade - the betleH vaQqu' !! Whether you are fortunate enough to create your own custom weapons, aspire to learn the art or just want to associate with blade-smiths, *The Guild* is here to serve you and the Empire.
K'Daq son of Toragh
![]()
There has been some discussion lately on the origins of the Klingon culture, in terms of the writer's concept. I have tried to find an article I have in which John Colicos is interviewed, but I have had little success. The *gyst* of the interview was that Colicos was told to *be creative* in how he used make-up and his ideas leaned toward more of a Mongol war lord. Needless to say, Paramount did not expand much on the Klingon culture and it was probably due to many fan's letters that any concept of honor and warrior spirit became associated with the Klingon Empire.
I have always felt that the Klingon warrior was most closely related to the ancient Samurai. The beliefs, discipline and ethics are virtually the same. For this reason I have always felt that the weapon smiths should behave in a similar manner as those of feudal Japan. Sword makers were well respected artists. They approached the creation of a blade as an almost religious event. In fact they had ceremonies in which the spirit of the blade was blessed so that it could better serve its owner.
Sword makers knew no political boundaries. You could seek out the finest craftsmen in the land and if they found you worthy of their skills, they would fashion you a blade. Obviously if the craftsman found you to be a dispicable individual, it was not likely that he would produce anything for you, so blood enemies would not tend to seek out artists who sided with their antagonists.
Thats what the Klingon weapon smith is to me. A craftsperson who quietly toils at his forge because of the pleasure it brings him. A person who is respected for the skill he/she posesses and for the blades they produce. No boasting, no posturing, no flashy show for attention......the blades do all the talking.
Make yours sing !
![]()
Tempering: K'Daq continues last month's topic
Two concepts that you need to remember before reading this article are that hard steel makes a finer edge and soft steel makes a stronger blade.We'll discuss this from two viewpoints:
1. The construction of a display weapon or prop.
2. The construction of a fully functional weapon. (*fully functional* can mean different things)
For any display weapon, there is no point in wading through any hardening process. If you find yourself with an already hardened piece of steel, you will need to follow K'Beck's instructions on bringing this to a soft state. Steel is a challenge to work with and there is no point in making it more so by using hard materials to start with. This is also advisable in the construction of working weapons. Start with your steel in a soft state.
Ideally we'd like to have a blade with a hard edge and a soft body - there are ways to achieve this. I will try to cover a few of the historical methods of creating this combination and hopefully give you the information you need to choose the best level of hardness for your projects.
We will start with the heavier, thick bladed weapons and move toward the thinner, light bladed ones. As a rule, as you move from heavier to lighter you go from softer to harder steel. Why? The heavier blades rely on their mass to fulfill their function. They are considered mass weapons like a mace, hammer or club. With a large mass behind a tapered, dull edge, a great deal of force per square inch can be applied to the point of impact which results in significant damage. This great force is also transmitted through the blade itself, so if it was treated to a hard state the weapon would most likely break. So........mass weapons do not need hard edges.
Axes straddle the line between mass blades and cutting blades. Depending on how large your axe is, it could be either. For this discussion we'll concentrate on the axe as a blade.
Typical axes have a 45 degree cutting bevel and this bevel is kept sharp. The heavy 45 degree angle cuts down on the amount of chipping of the edge but it still occurs. Axes are usually made by sandwiching a piece of tool steel in between two pieces of soft steel and forging them together. The tool steel only occupies a width large enough to accommodate the forge weld and the cutting bevel (this will vary according to size). With this combination the edge can be hardened while the body remains soft for strength.
In many ways the betleH is similar to an axe in its function. It certainly has mass and thick blades. There is substantial evidence supporting the need for the combination of hard edge and soft body for the sword of honor. There are frequent instances of the larger betleH being sheared in half due to it's brittle nature. In my opinion, a betleH functions much better when thought of as a mass weapon. The leverage produced by the broad blade design can lead to stress failure when the steel is hardened.
Swords require a soft, resilient body for strength, but they also require a hardened edge to be effective. Swords rely on the slashing action of the blade, therefore, a narrow efficient bevel produces the desired effect. Most swords don't have enough mass to drive the bevel through a target, so they need to hold a sharp, cutting edge. If this hard quality was carried throughout the body of the blade, the result would be a blade that snapped on contact. You could approach this problem as we did with the axe, but the size of the typical sword blade makes it difficult to sandwich metals together.
Two ancient earth cultures approached this problem with two entirely different techniques.
The Vikings would forge the body of their swords to a certain stage and leave the edge very blunt, then they would forgeweld a strip of hard steel around the perimeter of the body and this would become the cutting edge. This method produced a characteristic border on the Viking blade.
The feudal Japanese would fashion their blades by forging layers of steel together until the blade's form was complete, then they would coat the steel with clay to shield it from the forge's heat. By applying a thicker layer of clay to the body of the blade they could control the amount of heat it was subjected to and in this way they would temper the blade as if it were two entirely different pieces of steel. The end result was a hard edge and an extremely resilient body on their blades. Each bladesmith applied the clay in his own pattern and this produced a *trademark* pattern on the craftsman's blades.
When you get to the smaller blades the need for this combination of hardening is not as important. Most knife blades are hardened to a uniform level that allows for a cutting edge to be maintained. How hard you temper your knife blades is a matter of personal preference. K'Beck referred to the Rockwell scale in his article. This is a measurement of hardness. If you have your blades tempered commercially, you have to specify what level of hardness you want and this is done by assigning a Rockwell number to the desired state. Most knives will fall in a range of 57-60 on the Rockwell scale. In the 61+ range, steel becomes very brittle and the edge (even though hard) will chip, which destroys the blade's cutting efficiency.
Next month we will wrap up this topic with some methods you can employ to temper your projects and some additional information on the ability of certain metals to be tempered.
![]()
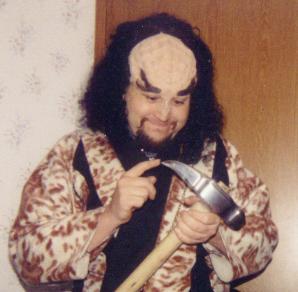
K'Beck's Klingon War Hammer
I was walking through a flee market that runs on weekends around here, when I saw this stange looking sledge hammer. From the moment I saw it, I had a mission! The guy sold it to me for $2.00. I could hardly wait to get it home and start grinding on it.
When I started, it weighed about 8lbs. My main goal was to lighten it down to about 4.
I found as I started working that If I cut groves with a hacksaw before I started grinding that for every minute I spent with the saw, saved me about 5 at the grinder. Cut the groves about a quarter inch apart and just short the depth that you want the channels.
I found that I could also lighten it by inceasing the 45 degree bevels on the corners. I had to reface the main striking surface, it just had too much wear on it to look good. Once I began working on the "beak" end, I saw that it had the potential to look like a birds beak, so I tried to round off the top an bring it down to a sharp point.
Notice the evil grin.
I ground a deep bevel along the bottom to give the impression of the lower portion of beak and rounded the back portion of the bevels to be a jaw line. I'll take a center punch and chisel and add in the eye and nasel opening in latter.

I am going to increase the depth of the bevels where the black arrows are. I am still deciding if I want to flatten or round off the front. (where the red arrow is.)
Over all this project is a test in patience. There isn't really anything new in this , it just requires more grinding, more patience, and and the tenacity not to get in a hurry.
Editor's note: What a glorious project ! If thats an evil grin in the second picture, then I guess I'm evil too cuz I'm grinning like that just looking at it. I need to send you some pics of the railroad hammer I have. Its totally different than yours. We could start a war hammer section of the Guild. I am anxious to see the conclusion of this project and I know the other member's are as well.
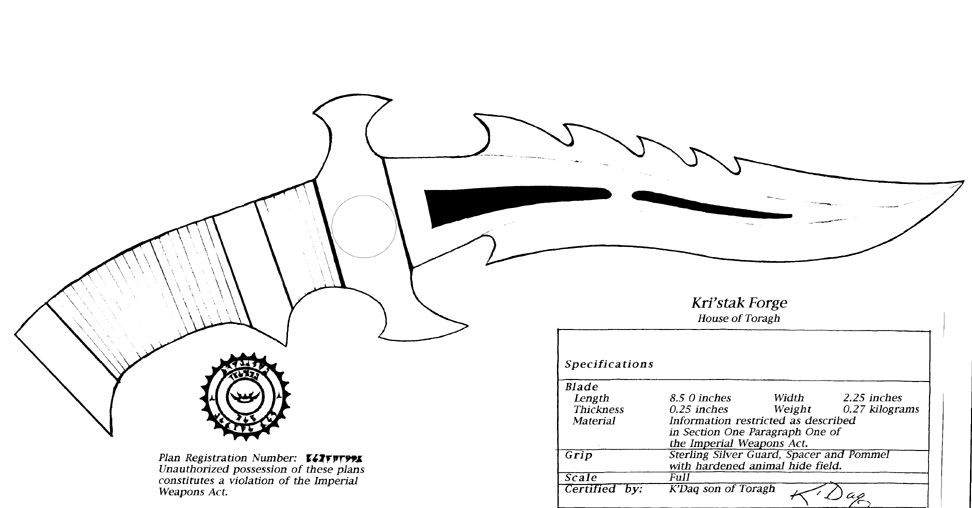
The QIS
Since we have gained quite a few new members, I thought I would revisit the QIS project. This was our initial beginners project which we used to show many of the standard knifemaking techniques. The knife itself is from *Star Trek: Generations* and is carried by B'Etor. For those of you who are familiar with Gil Hibben's work, you can see his obvious hand in this design, but it is not a production model. The saw teeth and blade cutouts along with the trefoil are all unique in their design.
![]()
The War Hammer Project
Several weeks ago K'Beck started work on an original design involving a Klingon War Hammer (as seen above). One of the primary goals of the Guild is to encourage original thought and design as it would occur among weapon smiths on Qo'noS. This goal led to the War hammer Project. The designs that follow are all original and all Klingon.
may'qel
may'qel's design takes into account the heavy influence of birds of prey in Klingon design. The rear elements function as talons and create a very efficient puncturing capacity to the weapon. The front element is clean and simple, with no wasted steel and can obviously carry out the primary function of a hammer, which is to crush, crack and render an enemy senseless. The additional barbs and projections at the throat of the weapon increase the warrior's battlefield *options*.
K'toQ
K'toQ's design also displays obvious bird of prey influence. In this design you can puncture and crush with the same stroke. This design is a much heavier hammer than may'qel's and this is offset by a long handle. A hammer of this mass would be slower on the battlefield so the addition of the spiked pommel doubles the warrior's attack efficiency and compensates for any decrease in speed.
K'Daq
In my hammer, I went primarily for a puncturing ability. I reasoned that the Klingon warrior had a thick exo-skeleton and that puncturing it would be more productive in battle. I also added a pommel with a sharp beveled edge and a spike to compensate for the slow nature of the weapon. This is a smaller hammer (along the lines of may'qel's) but the additional mass centered over the shaft of the weapon should provide sufficient force to accomplish it's function.