

I welcome all of you who appreciate the seductive curves and radiant warmth of steel fashioned into the perfect Klingon blade - the betleH vaQqu' !!. Whether you are fortunate enough to create your own custom weapons, aspire to learn the art or just want to associate with blade-smiths, *The Guild* is here to serve you and the Empire.
mupwI' (The Hammer) is the name of the newsletter for obvious reasons. The Hammer symbolizes our skill and our motto (which will end this letter) which we will live by.
Blade makers are respected and highly honored members of the Klingon Empire. Remember that even though " four thousand throats can be cut in one night by a running man ", he needs a good blade to do it. Carry this honor well and may your hammer swing true and your forge burn hot.
As I have written earlier, *mupwI'* will be entirely electronic in nature unless a project arises that lends itself to snail mail. I know some members will not have access to the attachments of pictures and drawings that will be a part of the letter. I will *archive* each letter on our web site in its complete form with pictures for those of you who have web access. It is my plan to eventually produce a snail version with pics as well so we can reach as many crafts people as possible. There is much to be learned and the larger we grow as an organization the more we benefit.
Remember this is YOUR Guild. I not only welcome input but expect it.
mupwI' yI'uchtaH !! (Keep holding the hammer ! - the motto of the
*Guild*)
K'Daq son of Toragh
Master of the Heart of
Kri'stak

> Honored K'Daq,
I am very much a novice and would welcome your
>advice on basic tools and the best type of metals to use (supply sources
too).
Qapla!
Morac Kale
> jmmc2783@usa.net
Honored
Morac !
By the beard of Kahless, an excellent question!! - and a fitting one for the first edition of *mupwI'*. This is will cover topics that we will no doubt argue about for years to come. I will try to be as neutral as possible so that you as the craftsman can make some of the decisions yourself.
First let me answer the easy part. I use a local supplier for my metal,
leather and handle material. He is well known nationally among knife makers and
as a rule his sort of business is not exactly abundant. I will include his name
address and phone number so you can order one of his catalogues. It is well
illustrated and he has an extensive supply of knife shapes already made (for
those just starting) and a complete assortment of metal *blanks* for those who
are already into custom knives. He also has an enormous stock of horns from
every legal animal and you can really *dress* your project up with these. Any
members who have similar businesses in their area - please send those names in
as well and I'll publish them in subsequent newsletters.
Texas Knife
maker's Supply
10649 Haddington #180
Houston, TX
77043
(713) 461-8632
(713) 461-8221 (FAX)
The owner is Mr. Ed Thuesen and last I saw the catalogue was $2.00 (US) He
ships UPS and is almost always available to answer questions or help you with
ordering just the right items. He's a VERY honorable man - for a Terran.
Tools. This is going to be determined by how much money you want to spend and how serious you really are. You can also compensate for poor tools with added skill BUT you cannot overcome poor skill with expensive tools - so it's your call.
1. Belt grinder or some kind of motorized power grinding tool. I use a bench mounted 1HP belt grinder with a 3 inch wide abrasive belt. With this set up you take a *blank* of steel and work through a series of sandpaper *grits* usually starting at 60 or 80 grit for bulk reduction of material and eventually work up to a 400 to 600 grit that puts a low level luster on the blade. The final polishing is accomplished with a buffing wheel on a bench mounted motor using abrasive pastes or cakes to achieve a high shine. You can spend anywhere from $200 to $1500 on these machines. What is the difference ? Well my machine is a very simple one - (I started on the low end to see if I'd like it and do well) this means it only has one main grinding wheel. This limits you to the types of bevels you can put on a blade. The more expensive machines allow you to interchange main wheels and make a variety of grinds on a project. If you are *inventive* enough you can make difficult grinds with single wheel machines, but a custom machine sure is nice. When I have to make unusual features work on a blade I borrow a friend's machine with a half inch main wheel attachment and it is VERY nice. My advice is get the basic entry machine. You can always use it for *bulk* reduction later if you buy a better model and if things don't work out you haven't mortgaged the farm.
** Alternatives - you can take a belt sander , turn it upside down and clamp it to a table and make a respectable grinder. It takes a little longer to finish a project but the entry cost is low and abrasive belts are very available.
The grinder is also needed to shape and polish handle material when you finish your knives.
2. Drill press - Many projects are going to require some type of rivet or *peened* rod to secure handle material or pivoting blades. A drill press will allow you to drill a precise hole or series of parallel holes. Again this is not a must. A steady hand will suffice with a standard hand held drill.
3. Metal cutting band saw. These are nice to have, but they can be really costly. If you are only casually making knives you should find a local machine shop and have some one cut your patterns out. If you are using stainless you might need the use of a plasma torch and I have no idea how much they cost (but it can't be cost effective).
I use a *cut-off* saw fitted with stainless cutting blades. You can order these blades from Texas Knife maker's. The cut-off saw is designed to cut rods and bar stock, but it has a small table and swivels upright to allow flat stock to be cut. The good news is that it only cost $200, the bad news is that large projects don't always fit within it's *throat*. So for bat'leths its back to the plasma torch. I can get everything else done on it though. meqleths fit very nicely and they're over 20 inches long, and I recently cut the majority of an etlhnaQ' out on one and its.......well its a half bat'leth.
4. Standard propane torch. Some projects benefit from soldering the guard to the blade. This is the tool for that, but its not required. Soldering cuts down on *rattle* if your guard doesn't quite fit the tang of the blade and it seals the handle from the leaching of blood and debris. If you're making a skinning knife or other type knife that is going to be well used, this is a major consideration to prevent spread of infectious disease, but otherwise its not always necessary.
5. Hand files. Just an assortment of standard flat, triangular and round files to dress up any tight bevels and get you a good fit of blade to handle/guard.
6. Glue - Epoxy epoxy epoxy. I use 2 - Ton epoxy by Devcon because it's water proof. It also has a 20 minute working time in case you have a lot of manipulating to do.
7.** A Forge ?? If you really get into this craft you'll want to hammer some
steel. Its a real blast. Entry level knife making can be accomplished by purchasing pre-made blades
and a variety of handle materials. This allows you to construct a knife and get
the feel for the process with very little investment before you wade into deeper
waters.
OK that should do it for tools. If I forgot one I'm sure I'll hear from the
membership. }};-)
This brings us to metals. If you ask 10 knife makers the best metal to use
you'll probably get 3 or 4.......... or more answers. This is the eternal
question/argument/debate among the craft. I will try to give you a neutral
assessment of each one and you can apply it to your own situation.
There are 3 basic types of steel used in custom knives. 1. Stainless , 2.
High carbon, 3. Pattern welded or Damascus .
1. Stainless - Stainless steel has a number of elements added to make it
harder and resistant to rust. These vary quite a bit and hence you get a number
of designations of stainless. A common designation is 440C. You have to be
careful when buying steel, because some of it cannot be heat treated and
therefore you cannot harden the blade to hold a cutting edge. If you are making
a display piece this is not a problem. The advantages of stainless are its
upkeep - under most circumstances it will not rust and it can polish to a mirror
finish. The disadvantage is that it does not hold an edge as well as carbon
steel. (This is the area of the BIG debate. Stainless advocates don't *buy* this
comment and I personally have never had a problem with it.)
2. High Carbon steel - Since steel is just iron with carbon infused into it
you have to be sure you are getting a grade of steel that is heat treatable.
There is a wide variety of carbon steels - each one bringing some quality that
falls under *personal preference* of the crafts person. The disadvantage of
carbon steel is upkeep. It is can and will rust unless cared for appropriately
and it can't be taken to a mirror finish. The advantage is that it CAN be
hardened to a higher level than stainless..........whether this is a true
advantage remains to be seen.......**see stainless argument**.
3. Damascus - now this is kewl stuff. This involves a process of welding
layers of high and low carbon steel together by heating them in a forge and
hammering them together. The heat and hammer blows weld the metal, and by
folding and welding the stock a number of times you create multiple layers. The
result is a metal that has the hardness of the high carbon steel and the
ductility of the low carbon. This produces some amazing metallurgic qualities.
It also has an unforgettable appearance - it looks like cut wood. Each piece
will have a grain pattern just like a tree depending on how you hammered it and
how many times you folded the stock. I prefer about 3-400 layers for the look
alone. If you look at the DS9 episode on the Sword of Kahless you'll note what
appears to be that sort of pattern. I have a project on the drawing board to
make a Damascus Sword of Kahless. To me that's the ultimate. OK now you have some ammo. We'll go into greater detail on all of these
topics in later newsletters in the *tips* section. I welcome any input other
members might have. I'd like to see this subject completely covered because it's
the foundation for what we're doing. K'Daq As the Guild grows, we will try to enhance camaraderie by publishing
histories of our members (both Klingon and Terran). It is not necessary to
develop a family history to be a Guild member, but it does help to solidify an
image of you as a fellow crafts person and Klin. Toragh fought with Kahless against the Tyrant Molar in the battles that were
to unite the Klingon Houses and form the Empire itself. He was the most
respected metal-smith of his time and was called upon to make the sword that
Kahless had seen in his dream. This became the first bat'leth and was used to by
Kahless to defeat Molar.
After Molar was defeated Kahless asked Toragh to take any of the tyrant's
possessions as payment and Toragh refused saying "I want nothing that miserable
petaQ has called his own."
As a matter of honor, Kahless insisted that Toragh name a payment. He thought
about it for a moment and replied "I will take the land from the western peak of
Kri'stak to the waters of Lursor as payment."
"So be it !" Kahless replied, "Our debt is settled." "You are an honorable
warrior and my good friend.......your request will be honored."
Toragh built his house in the shadows of Kri'stak and used the *blood* of
Qo'noS itself to forge his weapons. The secrets of Toragh have been passed down
through the generations and now reside with K'Daq - an ancient Klingon warrior.
Through treachery the House of Toragh has almost vanished from the Empire.
When K'Daq reached the *Age of Wisdom* he petitioned for and was welcomed into
the House of Kasara. It was his desire to spend the end of his days working
among honorable Klin - looking for one to which he could pass the gift of the
blade.
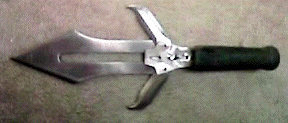
The standard companion of the Klingon warrior. Consists of a double edged
primary blade and 2 secondary blades that form the guard.
Three versions of the knife have been documented in TNG, DS9 and the movies.
Early versions where slightly smaller than the current models with elaborate
mechanical stylings overlaying the guards. The guards were also fully
retractable and locked into open position with a button and spring mechanism.
Later the Next Generation models simplified the area covering the guards (which
remained fully functional) and the primary blade was slightly larger in size.
The most recent versions remain the same in all respects to the TNG model except
the guards no longer function but are permanently fixed in the open position.
My personal preference is for the middle version. I like the simpler more
warrior like guard area - its much more functional and gives the appearance that
it was made by a craftsman and not a production line like the original ones
did...and lets face it.....watching those secondary blades snap out will
definitely get your attention !
An important consideration in the construction of the d'k tahg is the use of
springs in the mechanism. Using springs to operate the blades could be
considered a violation of any number of state and federal laws covering spring
operated knives. On a trip to Canada last year (1996) the only question customs
put to me about my knife collection was if any of them had springs in their
construction. So either be well versed on the laws covering the subject in your
area or design a mechanical system to open the guard. The picture included in
this edition are of one using a spring free mechanism. This mechanism will be
detailed later in a blue-print style drawing that will be made available to the
membership. Additionally, the covering has been left off of the guard area to
give a better idea of the relationship of the guards to the primary blade. The
handle seen is hardened leather. With very few exceptions, I use hardened
leather for all of my handles. It is very comfortable, functional and gives the
look of a weapon that a warrior would be proud of owning and using. Remember to write with any material you'd like to have discussed or placed in
*mupwI'* .. mupwI' yI'uchtaH !! K'Daq

K'Daq son of Toragh
Next month : K'Beck's story.

d'k tahg

thickness of primary blade - .25 inches
length of
blade - 9 inches.
length of blade and handle (full length) - 16.5
inches
width of blade - 3.25 inches
length of guard blade -(to
pivot pt) 4.5 inches
width of guard - .875 inches
Next month : meqleH
Vol. 1 No. 2